After several trials with virtual machines using nested virtualisation, I've managed to define the installation of my machines properly.
| Version | Date | Comments |
|---|---|---|
| 1 | 01/2024 | Post creation |
| 1.1 | 01/2024 | Move from BTRFS to XFS, subnet to B class instead of C class, update screenshots, reformulations |
Technical choices
After countless weeks, even months, of careful thought and testing (hello web colleagues and friends), I came up with a technical solution that fully met my requirements. This solution has been successfully deployed on multiple hosts, supporting substantial workloads. This type of architecture is also often favoured across the Atlantic by enthusiasts. The general idea of the homelab is to have a cluster of Proxmox machines and unified storage between them. Hyper-convergence is pushed to the maximum of available capacities. Here are the features:
- Base OS : Debian 12.x
- Hypervisor : Proxmox VE 8.x
- System storage : boot via EFI, partitions LVM+XFS for system, home et tmp.
- VM storage : Ceph. As I only have one hard disk, I want and need to use Ceph on the only disk available to me.
- Network : subnet with /16 for everything. One VLAN is tagged for Ceph only (described below). For businesses, prefer at least a 10 Gbit/s network, with dedicated network cards and LAG.
My process began with the installation of the official “netinst” ISO image of Debian 12.4. This step was essential to establish the foundation necessary for the subsequent installation of Proxmox. For this project, I have 4 identical machines, all Chuwi LarkBox X 2024s. Each machine is equipped with a 512 GB NVMe SSD and two network cards: an Intel 1 GE and a Realtek 2.5 GE.
The challenge was to get the entire system and Ceph to run on this drive alone. To do this, I undertook the following partitioning:
- Partition 1 : EFI — 512 Mb, boot
- Partition 2 : LVM “system” — 96 Gb
- lv “root”, 48 Gb, mounted on
/, XFS - lv “home”, 12 Gb, mounted on
/home, EXT4 - lv “tmp”, 8 Gb, mounted on
/tmp, EXT4 - lv “swap”, 8 Gb, for swap usage only.
- lv “root”, 48 Gb, mounted on
- Partition 3 : 350 Gb, reserved for Ceph OSD. It is important not to create this partition during the initial installation of Debian. I'll come back later to configure it when setting up the environment.
The root partition (/) will house the operating system, among other things. Given that Proxmox and Ceph generate a considerable volume of data (due to logs), I preferred to avoid any potential restrictions due to the limited number of inodes. Although an EXT4 partition may be sufficient for small home labs without reaching the limits, I opted for an early approach.
The /home and /tmp partitions will benefit from reinforced configurations to minimise the attack surface and limit abuse.
Installation and configuration of Proxmox and Ceph
Proxmox part
To install Proxmox, I strictly followed the instructions detailed in the article available at this address. All the steps described were scrupulously reproduced to obtain a functional, ready-to-use installation.
Once Proxmox is installed and operational, the network bridges are created in the “Network” section. I set up a dedicated bridge for each network card, as shown in the example below:

The network card “enp1s0” is dedicated to my LAN, and the network card “enp2s0” is dedicated only for Ceph. A tagged VLAN is created on my switch, and I created a “Linux VLAN” with the same VLAN ID. The bridge “vmbr15” will be used by VM to access to the CephFS storage.
Do this on each host to ensure a uniform configuration, which is crucial for the consistency of the infrastructure. It is imperative to guarantee identical NTP synchronization between hosts, as Ceph will not function correctly without this.
In addition, be sure to check and update the “hosts” file to reflect the IP address and name of each Proxmox host. Although the DNS server performs this operation, consider this input step as a backup, which could prove vital for the cohesion of the cluster.
At this point, you should be ready to create a cluster and connect your Proxmox hosts. I voluntarily skip the SSH configuration, key exchange and similar technical niceties. For the creation of a Proxmox cluster, I recommend that you watch the video made by my dad:
Ceph part
Let's move on to the phase that promised to be the most complex: configuring Ceph. To take full advantage of Ceph's capabilities, it is recommended to have at least 3 dedicated disks per machine and to connect these machines via a minimum 10 Gbit/s network. In my homelab, I opted for a functional and minimal configuration.
I went back to my system disk, using the cfdisk utility to create the partition for the Ceph OSD. You can also use other disk management tools such as fdisk, depending on your preference.
As my disk is a NVMe device, I used the command $ cfdisk /dev/nvme0n1. I created a new partition of fixed size (the size must be the same on all the disks in the other machines) and of “Ceph OSD” type. Then I saved the changes (“Write” button) and quit the tool. This procedure must be repeated on each machine.
In the Proxmox web interface, go to the "Ceph" section and install the Ceph tools. Navigate to the “Ceph” tab, then to the “OSD” section, and click on “Create OSD”. Select the partition you created earlier, and repeat this operation on all Proxmox hosts.
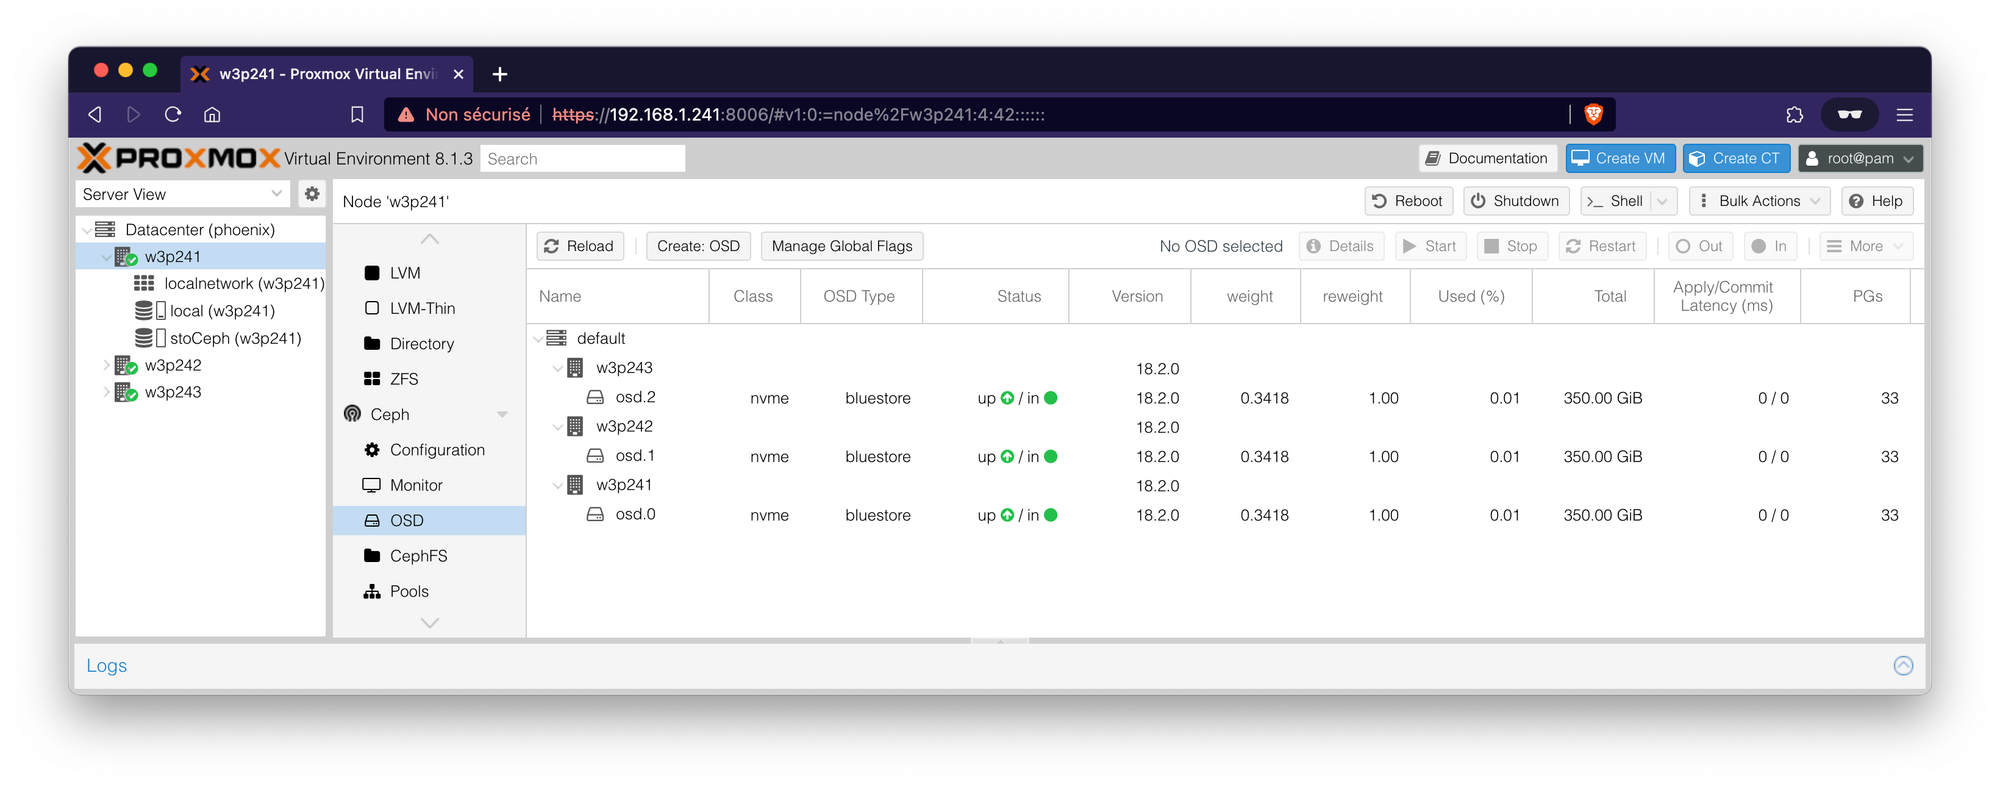
Once these changes have been validated, Ceph is now operational on the same disk as your system. It is important to remember that this solution works, but does not guarantee optimum performance if you are aiming for a high level of performance.
To enable Ceph to run, you need to create Monitors, MDSs (for CephFS, optional if you don't intend to use CephFS) and Managers. I won't go into detail here. On my three machines, I've set up two monitors on host 1 and host 3. In addition, I've set up three Managers (one per host, they go to sleep as long as at least one is active) and an MDS on host 2. This configuration gives each host a specific role and a service to run.
With this configuration, you now have unified, centralized storage for your virtual machines. It is possible to create CephFS storage on these same OSDs, for example, to store your ISO images and make them accessible from any host in the cluster. To do this, start by creating an “MDS” in the “CephFS” tab, then configure the CephFS storage. I personally created a CephFS with a pg of 128 (default configuration, adjust after testing if necessary).
Et voilà !
Now you have a Proxmox cluster with hyper-converged Ceph storage for very little money. You can look forward to Ceph debugging when you start using it. ;-)
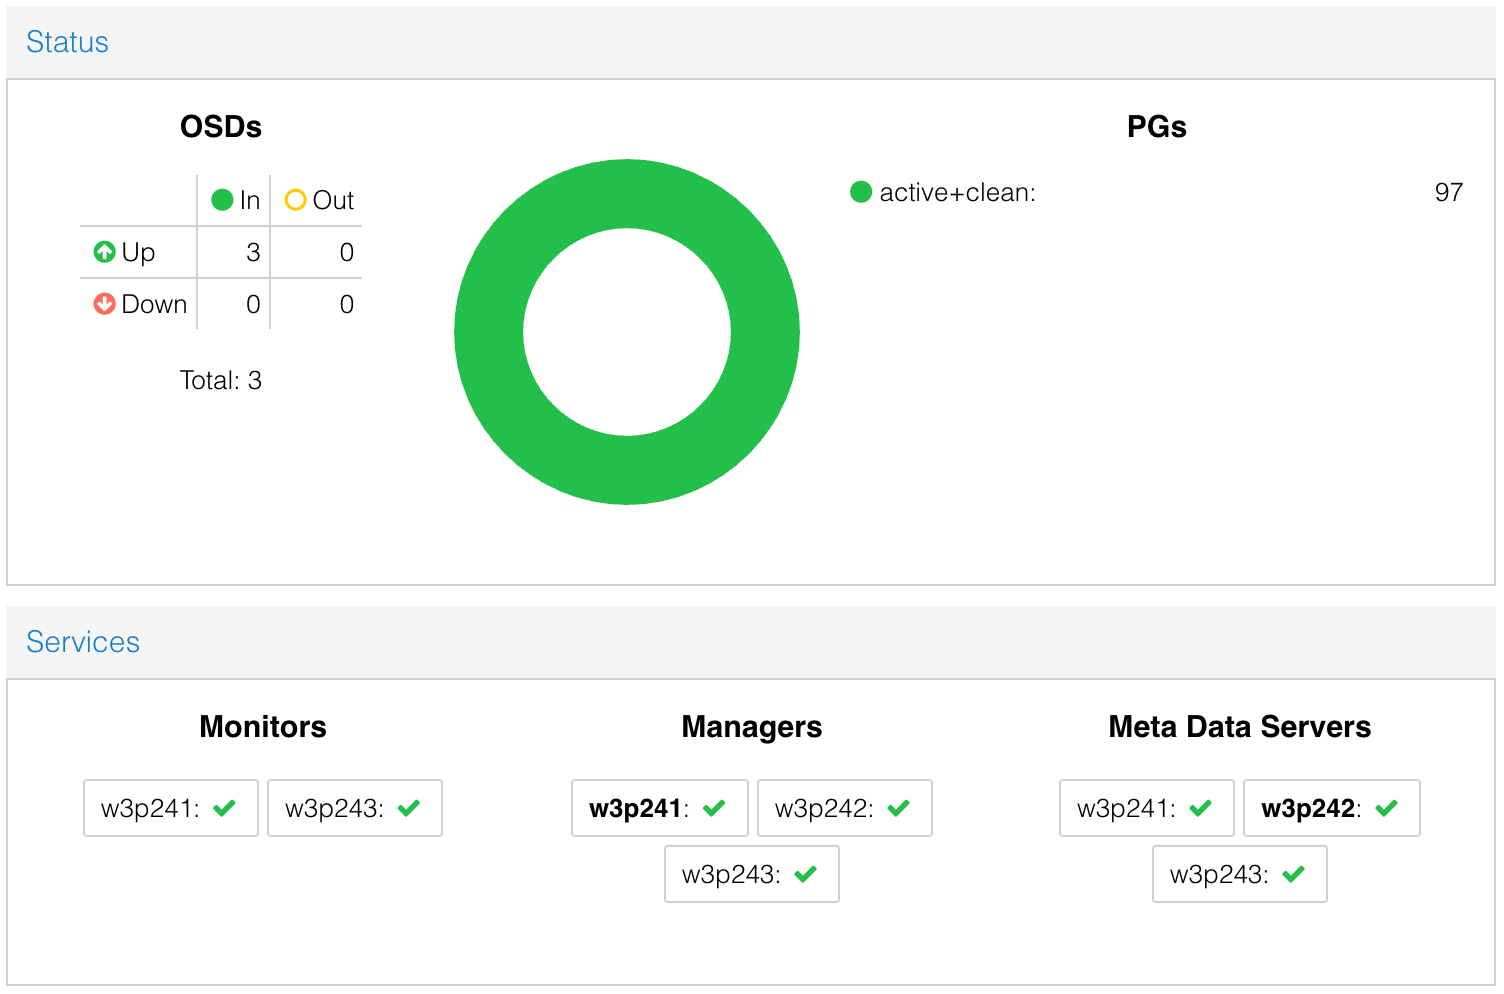
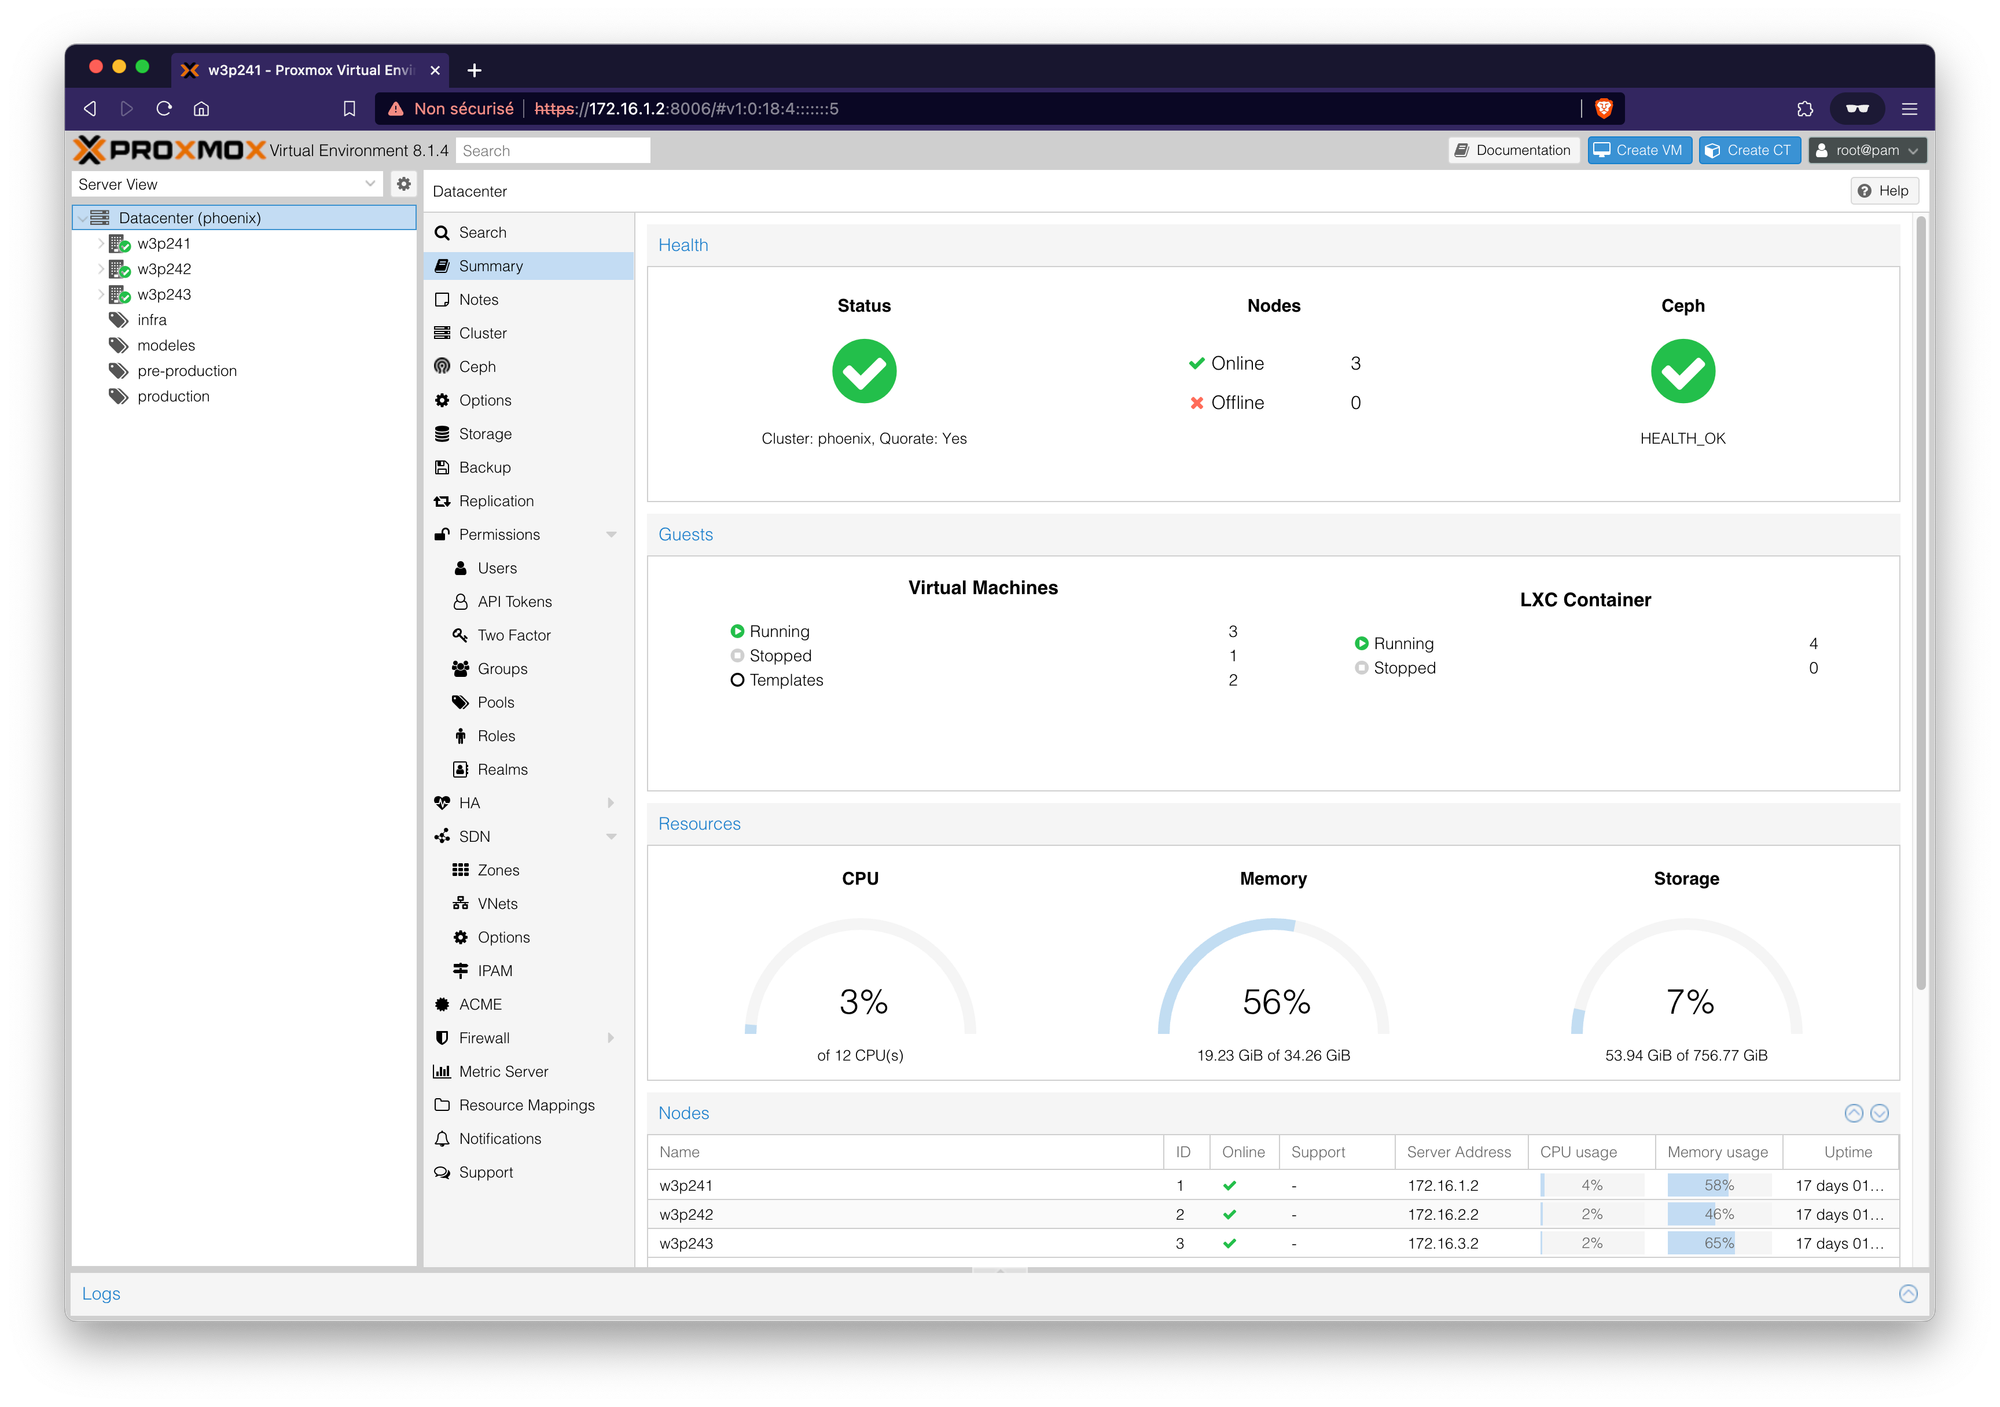
Final result:
Ceph status page:

At the time of writing this article, this configuration and this cluster have a life of one day, with no load on them. No errors after checking the various log files.