
These days, task automation and the creation of immutable infrastructures are essential. With this in mind, the use of tools such as Terraform becomes particularly interesting for the creation of LXC containers on a Proxmox host.
The idea behind this approach is to deploy containers to isolate and host different services, while avoiding the usual use of Docker or Podman. In addition to the security aspect of this method, it also aims to explore and make full use of the tools available.
This document assumes that you are already familiar with Terraform, that you have administrative rights to Proxmox, and that you are able to carry out operations without major constraints.
Rather than reinventing the wheel (again), I suggest you read Quentin's article, "au final, qu'est-ce qu'un conteneur ?", to find out what a Linux container is.
The working environment for this article is as follows:
- a Proxmox 8.1.x server
- an LXC container in which I'll be installing Node Exporter with Ansible
Proxmox preparation
To simplify operations in your test environments, you can use the root@pam account created when Proxmox was installed. This account has all the privileges needed to perform actions on the platform. However, for more secure management, we recommend that you create a token for the root account.
Next, I'm going to create a user called "terrabot" in the "pve" realm. This account will have a specific role, with the necessary rights to create and manage containers, virtual machines and virtual disks.
Role creation
The first step is to create a role. This role will have the necessary rights to manage the machines and their storage. Here are all the necessary roles:
  "Datastore.Allocate",
  "Datastore.AllocateSpace",
  "Datastore.AllocateTemplate",
  "Datastore.Audit",
  "Pool.Allocate",
  "Pool.Audit",
  "SDN.Allocate",
  "SDN.Audit",
  "SDN.Use",
  "Sys.Audit",
  "Sys.Console",
  "VM.Allocate",
  "VM.Audit",
  "VM.Backup",
  "VM.Clone",
  "VM.Config.CDROM",
  "VM.Config.CPU",
  "VM.Config.Cloudinit",
  "VM.Config.Disk",
  "VM.Config.HWType",
  "VM.Config.Memory",
  "VM.Config.Network",
  "VM.Config.Options",
  "VM.Console",
  "VM.Migrate",
  "VM.Monitor",
  "VM.PowerMgmt",
  "VM.Snapshot",
  "VM.Snapshot.Rollback"
No, I didn't use Terraform to create this role, because Terraform needs this role before creating resources... Terraform-ception.
User creation
Now let's create the user "terrabot"; this user will be used exclusively for Terraform. Go to the "Permissions" tab, then to "Users", and click on the "Create" button. Create a new user in the "pve" realm, add information as required and confirm the changes.
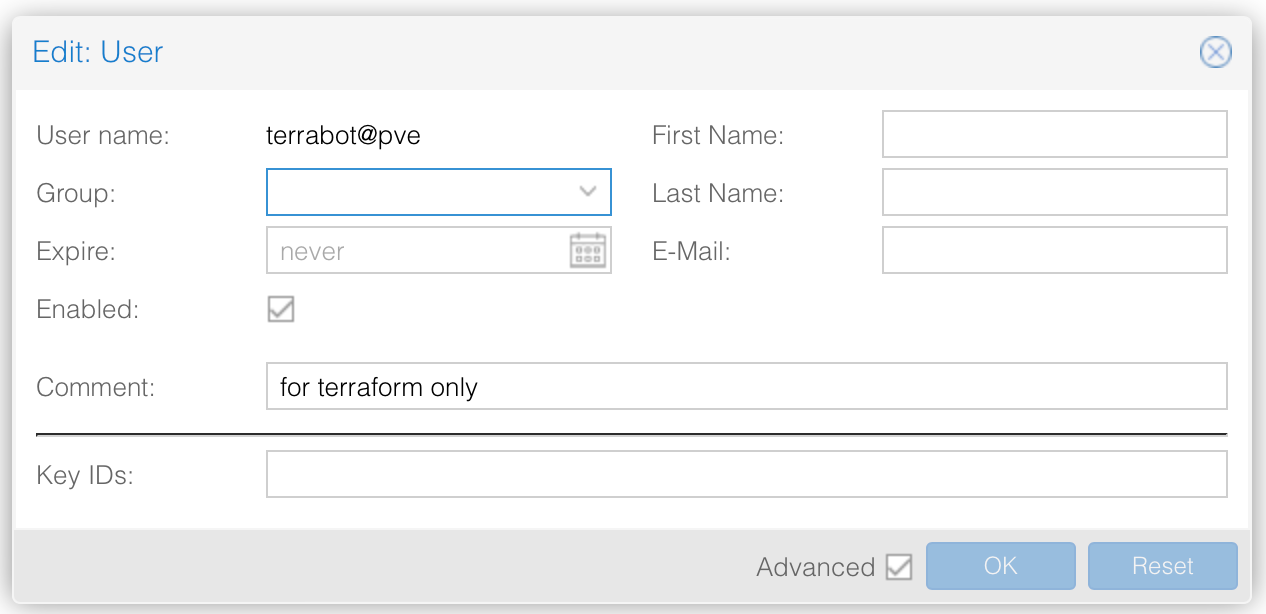
Then add a complex password to this user (you probably won't use it, but add a password anyway) and confirm these changes.
Token user creation
The penultimate step is to create a token for this newly created user. Still in the "Permissions" tab, click on the "API Token" link and click on the "Add" button. Enter the user and the name of the token. This name is important, as you'll need it later on in the Terraform code. Here, I've called this token "tf". I've unchecked the "Privileges separations" box and haven't set an expiry date for the token. In production environments, it is strongly recommended that you renew tokens regularly.
Role attribution
We've reached the final bend. Let's assign the role to our user, and more specifically to the token. Go back one last time to the "Permissions" tab and select "API User token". Choose the user you've created (Terrabot in this case) and select the "Terraform" role.
Complete Terraform code
Finally, here's the full code I use to create containers on Proxmox with Terraform. The code is fairly complete, as I like to have as much information and attributes as possible to specify my resources as precisely as possible.
Provider.tf" file:
### provider.tf
terraform {
  required_providers {
    proxmox = {
      source  = "bpg/proxmox"
      version = "0.41.0"
    }
  }
}

provider "proxmox" {
  endpoint  = var.pve_host_address
  api_token = var.pve_api_token
  insecure  = true
  ssh {
    agent    = true
    username = var.pve_api_user
  }
  tmp_dir = var.tmp_dir
}
File "variables.tf" :
### variables.tf
variable "ct_bridge" {
  type = string
}
variable "ct_datastore_storage_location" {
  type = string
}
variable "ct_datastore_template_location" {
  type = string
}
variable "ct_disk_size" {
  type    = string
  default = "20"
}
variable "ct_nic_rate_limit" {
  type = number
}
variable "ct_memory" {
  type = number
}
variable "ct_source_file_path" {
  type = string
}
variable "dns_domain" {
  type = string
}
variable "dns_server" {
  type = string
}
variable "gateway" {
  type = string
}
variable "os_type" {
  type = string
}
variable "pve_api_token" {
  type = string
}
variable "pve_api_user" {
  type = string
}
variable "pve_host_address" {
  type = string
}
variable "tmp_dir" {
  type = string
}
File "variables.auto.tfvars", this is the file that needs to be modified so that you can have a container corresponding to your needs:
### variables.auto.tfvars
ct_bridge                      = "vmbr0"
ct_datastore_storage_location  = "local"
ct_datastore_template_location = "local"
ct_disk_size                   = "20"
ct_nic_rate_limit              = 10
ct_memory                      = 128
ct_source_file_path            = "http://download.proxmox.com/images/system/debian-12-standard_12.2-1_amd64.tar.zst"
dns_domain                     = "domain.net"
dns_server                     = "192.168.1.1"
gateway                        = "192.168.1.1"
os_type                        = "debian"
pve_api_token                  = "terrabot@pve!tf=change-my-token"
pve_api_user                   = "terrabot"
pve_host_address               = "https://192.168.1.2:8006"
tmp_dir                        = "/var/tmp"
File "container.tf" :
### container.tf
# see https://registry.terraform.io/providers/hashicorp/random/latest/docs/resources/password.html. It will download "hashicorp/random" provider
resource "random_password" "container_root_password" {
  length           = 24
  override_special = "_%@"
  special          = true
}

output "container_root_password" {
  value     = random_password.container_root_password.result
  sensitive = true
}

# location of containers templates
resource "proxmox_virtual_environment_file" "debian_container_template" {
  content_type = "vztmpl"
  datastore_id = var.ct_datastore_template_location
  node_name    = "pve1"

  source_file {
    path = var.ct_source_file_path
  }
}

resource "proxmox_virtual_environment_container" "debian_container" {
  description   = "Managed by Terraform"
  node_name     = "pve1"
  start_on_boot = true
  tags          = ["linux", "infra"]
  unprivileged  = true
  vm_id         = 241001

  cpu {
    architecture = "amd64"
    cores        = 1
  }

  disk {
    datastore_id = var.ct_datastore_storage_location
    size         = var.ct_disk_size
  }

  memory {
    dedicated = var.ct_memory
    swap      = 0
  }

  operating_system {
    template_file_id = proxmox_virtual_environment_file.debian_container_template.id
    type             = var.os_type
  }

  initialization {
    hostname = "ct-example"

    dns {
      domain = var.dns_domain
      server = var.dns_server
    }

    ip_config {
      ipv4 {
        address = "192.168.1.3/24"
        gateway = var.gateway
      }
    }
    user_account {
      keys     = ["put-your-ssh-pubkey-here"]
      password = random_password.container_root_password.result
    }
  }
  network_interface {
    name       = var.ct_bridge
    rate_limit = var.ct_nic_rate_limit
  }

  features {
    nesting = true
    fuse    = false
  }
}
In this file, you need to modify values such as the name of the Proxmox machine (node_name), the IPv4 address of the container (address), the SSH public key (keys) and the name of the container (hostname). To make this code evolve, it may be useful to create loops and conditions...


